Deckbox Connections
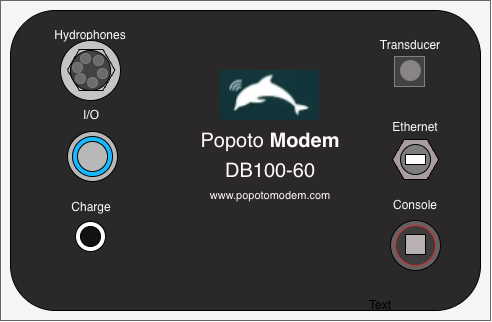
The DB100 Deckbox is a self-contained way to begin working with the Popoto Modem. It integrates a battery and the necessary interfaces for connecting to a laptop through USB or Ethernet.
The DB100 is composed of a Popoto Modem electronics board set, a Popoto Interface board, and a lithium-ion battery, all enclosed in a rugged Pelican 1300 case. All connectors are IP67 splash-proof, making the DB100 a portable and easy-to-use acoustic communications device.
The DB100 is designed for use with an external computation platform such as a laptop or single-board computer. It can interface to those devices through USB or Ethernet.
Front Panel
Dunking Transducer
The PMT-28-10-DT dunking transducer shipped with the Popoto Modem is cabled with a 10 meter polyurethane cable connected to a 4-pin JAE connector.
Transducer Connector Specifications
The DB-100 Deckbox series includes several models that use different transducer connectors. These connectors are critical for correct functionality and compatibility with transducer and hydrophone systems.
To connect the transducer, line up the connectors and press down until you hear a click. To remove the cable, turn the collar counterclockwise and pull up.
DB-100-60
The DB-100-60 model uses a 10-pin JAE JN1AS10ML1 connector to accommodate additional hydrophones.
1 | Transducer Positive |
| 2 | Hydrophone 1 Positive |
| 3 | Hydrophone 2 Positive |
| 4 | Hydrophone 3 Positive |
| 5 | Hydrophone 4 Positive |
| 6 | Hydrophone 5 Positive |
| 7 | Hydrophone 6 Positive |
| 8 | Hydrophone 7 Positive |
| 9 | Hydrophone 8 Positive |
| 10 | Ground |
USB
The USB port on the front panel connects to a computer's USB host port. This connection provides two USB-serial channels. From the factory, the first channel is connected to pshell and the second channel is connected to the Popoto Modem's Linux console. This is generally the fastest way to get started with the Popoto Deckbox.
Use the supplied cable to connect the deckbox to a host computer using a serial connection. Depending on the number of devices you are connecting and the number of USB ports on the computer, you may need a USB hub.
Ethernet
The Ethernet port on the front panel is designed to operate with the Stewart locking Ethernet cable. This cable has a locking connector that keeps the Ethernet connection watertight.
Although it is possible to use a standard Ethernet cable, it is not recommended. The IP-rated Ethernet connector does not include a provision to latch a standard Ethernet cable in place. Failure to use the proper locking cable may result in unreliable Ethernet connections.
Line up the connector, push down, twist the collar clockwise. to remove, twist the collar counterclockwise and pull up.
Charging
The front panel features a charging port that uses a Switchcraft 721FMS connector. This connector uses a tip-positive pin configuration for compatibility with the Popoto constant-current, constant-voltage (CCCV) battery charger.
The charger connects directly to this port, providing an efficient charging path for the Deckbox battery.
The deckbox will completely charge in approximately 8 hours and the battery will last approximately 24 hours on a full charge.
I/O (Power On/Off)
Press the **I/O **button to turn on the deckbox. The button illuminates blue when turned on. Press the I/O button to turn off the deckbox. The button will no longer be illuminated when the device is powered down.
Caring for the Deckbox
To ensure long life and optimal performance, keep the DB100 Pelican case clean. Because sensitive electronics are housed inside the case, use cleaning methods that minimize the risk of water damage.
Periodically perform the following to help preserve the DB100 Pelican case and protect the electronics from moisture-related damage:
- Preparation: Ensure the DB100 is switched off and disconnected from external power sources.
- Dusting: Use a soft, dry cloth or a brush with gentle bristles to remove loose dust and debris from the case surface.
- Spot cleaning: For stubborn dirt, slightly dampen a soft cloth with water and a mild soap solution if needed. Wring the cloth well to avoid excess moisture, then gently wipe the affected areas without saturating the case.
- Using spray cleaners: If using spray cleaners, choose products designed for electronics or mild, non-abrasive products. Spray the cleaner onto the cloth rather than directly onto the case.
- Drying: After cleaning, thoroughly dry the case with a clean, soft cloth. Confirm that the case is completely dry before reconnecting power or using the DB100.
- Regular checks: Periodically inspect the case for signs of wear or damage, especially around seals and fasteners. Maintaining case integrity is important for protecting the DB100 from environmental elements.