Connecting Equipment to the Deckbox
Next, we'll connect the transducer, host computer, and charger to the DB-100-60.
The DB100 is composed of a Popoto Modem electronics board set, a Popoto Interface board, and a lithium-ion battery, all enclosed in a rugged Pelican 1300 case. All connectors are IP67 splash-proof, making the DB100 a portable and easy-to-use acoustic communications device.
The DB100 is designed for use with an external computation platform such as a laptop or single-board computer. It can interface to those devices through USB or Ethernet.
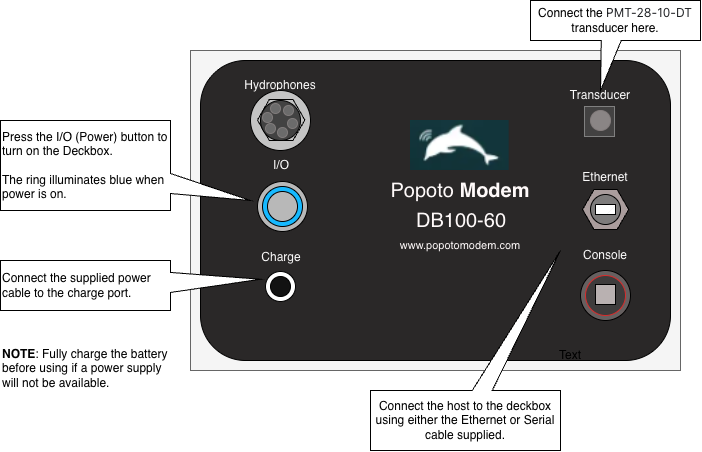
Deckbox DB-100-60 Front Panel
Initial Setup
-
Connect the transducer to the Transducer port.
The PMT-28-10-DT dunking transducer shipped with the Popoto Modem is cabled with a 10 meter polyurethane cable connected to a 4-pin JAE connector.
Connect the transducer to the transducer connector on the front panel of the DB100 Deckbox. Align the arrow on the cable connector with the top mark on the Deckbox connector. Gently seat the connector, then push it in until a positive click indicates that it is securely connected.
-
Connect your laptop to the deckbox. Connect it to the Console port for serial connection or connect to the Ethernet port.
USB
The USB port on the front panel connects to a computer's USB host port. This connection provides two USB-serial channels. From the factory, the first channel is connected to pshell and the second channel is connected to the Popoto Modem's Linux console.
Use the supplied cable to connect the deckbox to a host computer using a serial connection.
Ethernet
Ethernet provides access to the Web UI and is the recommended connection for this guide. The Ethernet port on the front panel is designed to operate with the Stewart locking Ethernet cable. This cable has a locking connector that keeps the Ethernet connection watertight.
Line up the connector, push down, and twist the collar clockwise. To remove, twist the collar counterclockwise and pull up.
noteAlthough it is possible to use a standard Ethernet cable, it is not recommended. Failure to use the proper locking cable may result in unreliable Ethernet connections.
-
Connect the power source to the Charge port on the deckbox.
The front panel features a charging port that uses a Switchcraft 721FMS connector. This connector uses a tip-positive pin configuration for compatibility with the Popoto constant-current, constant-voltage (CCCV) battery charger.
The charger connects directly to this port, providing an efficient charging path for the Deckbox battery. The deckbox will completely charge in approximately 8 hours and the battery will last approximately 24 hours on a full charge.
-
Power on the unit.
Press the I/O button to turn on the deckbox. The ring around the button illuminates blue when turned on. Press the I/O button to turn off the deckbox. The button will no longer be illuminated when the device is powered down. Depending on the model, it may take up to 3 seconds for the light around the button to illuminate.
Hydrophones
The DB-100-60 supports two Hydrophone Input Interface connectors to digitize acoustic data from up to eight hydrophones in addition to the standard acoustic transducer interface. The hydrophones are connected to the hydrophone connectors on the front panel of the Deckbox. Ensure that the connectors are properly aligned and securely seated to maintain a reliable acoustic connection.
The Hydrophone is not part of this Getting Started procedure. Refer to the Hydrophone Input Interface for details.
Interface Control Details
For details and pinouts, refer to Deckbox Connections.
Next: Now that we have connected equipment to the deckbox, we will establish communication between the host device and the modem.
Continue to Establishing Communication with Host.